Showing posts with label projects. Show all posts

August 1, 2012

hand stamped jam knives

I shared on Monday about my jam making adventure. I also left you with a preview of a small project I did as an accompaniment to my gifting jars of peach jam to friends and family. Im sure we've all seen the hammered flat spoons with stamped lettering, right? Here's another spin on silverware stamping, butter/jam knives.
I made a stop by the thrift store and picked up a variety of spreader knives for $.10 each. Then using the metal stamping kit I already had I picked a phrase and steadied my hand. One good whack of the hammer on the end of the stamp was all it took. The hardest part is lining up the letters straight and getting a good impression on the silverware. Hit it too hard and you'll double up the letter, too soft and you wont get the full letter stamped into the knife.
After the knives were stamped I used a permanent sharpie and filled the letters in. Then I used a magic eraser to wipe off the excess sharpie, leaving the letters darkened. Then to make sure the knife is food safe I ran them through the dishwasher. Easy peasy!
Don't they make the most darling accessory? And they were easy! I'm going to help a friend stamp names into spoons as favors for the kiddos at her daughters ice cream themed 3rd birthday party. How cute is that idea?!

April 4, 2012

diy blackboard

I just wanted to share with you a project I completed last week, a DIY kitchen blackboard. It was beyond easy, and only cost me $3.99! I've been wanting a chalkboard near the kitchen to write lists, notes, and menu plans on but the size of the wall I wanted to put it on was rather awkward. 
The frame I picked up at the thrift store, and the paint I already had. I just gave the frame a coat of white paint, then sanded around the edges for a distressed look. Then I flipped the mat board in the frame over and gave it two good coats of chalkboard paint. 
Easy peasy. 
If you're wondering where the quote is from, it's from the original movie Charlie and the Chocolate Factory. Willy Wonka whispers "so shines a good deed in a weary world" when Charlie gives back the gobstopper. It's probably my all time favorite quote. Ever. :)
Have a good day!

February 8, 2012

mason jar + felt = love

I've been addicted to Pinterest (who isn't, right?) for a long while now. It's just the most amazing place to find new recipes, projects, and inspiration. I came across these Valentines day jars and happened to have everything to make them on hand (love when that happens).
First off I dyed my doilies in coffee. Don't worry, it was cold, old, stale coffee from the morning (wouldn't want to go wasting good coffee now would we?). I basically just let the doilies soak in the coffee for a few min, then placed them on a paper towel to dry. The rule of thumb is that the longer you leave them in, the darker they get.
 Then you just cut some hearts out of felt, and wrap the doilies and felt hearts around the jar with your bakers twine. I used a variety of jars I had on hand, so anything goes. Then you can fill your jars with candy or even use them as small flower vases. Easy peasy.
 If you want to check out the original blog post on how to make these click on over to this blog.

February 6, 2012

handmade valentines

While the husband and I were grocery shopping the other day Ella spotted a box of Princess valentines. She screamed "Cinderella! Princess!" in the middle of the store so I let her hold the box while we finished shopping. When it was time to checkout, Travis and I did the whole "distract and hide" bit to get the valentines out of her hands (if you have kids you know exactly what that is). 

I had borrowed a silicone heart mold from a friend and planned to make some homemade crayons as valentines. It was a really really easy project and they turned out so cute! I can't wait to package them up and give them to her friends.
Here's how to do it:

Peel the paper off of the crayons and break them up into small pieces. Fill the mold with the crayon bits (not too full, you don't want the melted crayons to spill over) and stick the mold on a baking sheet lined with foil (in case any crayon spills over). Put it in the oven at 250 degrees for 10-15 minutes. You'll be able to see when all the crayon bits are completely melted. It's optional but before I put the crayon pieces into the mold I gave each mold a shake or two of glitter. Once the crayons are completely melted take them out and let them cool in the mold on the counter or for faster cooling you can put it in the freezer. Then just pop them out of their molds. And just like that, brand new crayons!
 Here they are cooled in the mold.
 I separated my red, pink and purple bits together and green and blue bits together. You can mix all  your colors together or separate them for a more uniform look. It's up to you!
 I bought some 4" clear cellophane bags at Michaels to package them up in and plan on making a bag topper to attach to the top. Of course this is not only a great project for Valentines, but for anytime you have a million broken crayons lying around. I think her little friends will really enjoy their sparkly crayon Valentines. <3


November 10, 2011

feathered turkey shirt tutorial

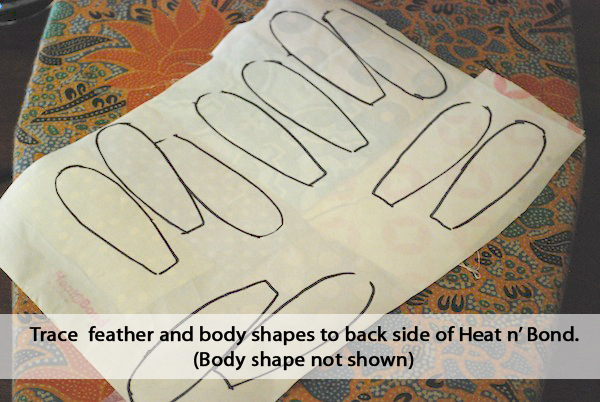
I know I've been MIA the last week or so and that this post it TOTALLY last minute, but here is a quick tutorial for the turkey applique shirt I make Ella to wear on Thanksgiving. Don't worry, it's super easy and a super quick project. Have a great Tuesday!

October 25, 2011

trick or treat bag

I've been going a little crazy with Halloween this year. Ok, who am I kidding? No I haven't, I just love any excuse to be crafty and make my little one fun things. Like this...a trick or treat bag.

When I was young my mother (who was a seamstress) made me a trick or treat bag. It had a witch on the front and her legs hung from the bottom of the bag. I used it every year for my trick or treating candy loot, and I loved carrying it. 
So, I thought Ella would want one of her own. Low and behold I dreamed up my version of a trick or treat bag for her. One side has ruffles and green ric rac (a halloween spin off my Ruffle Carryall Totes from the shop) and the other has her initial "E" appliqued along with yoyo flowers, fabric rosettes, a mini bow and some fun ribbon loops. 
I think it turned out darling and I hope she gets years and years of use out of it!

October 24, 2011

ruffle pumpkin shirt tutorial

Remember the shirt Ella wore to our outing at Apple Hill? Here's the tutorial so you can all make one for your little pumpkins. It's a pretty self explanatory tutorial so i'll let the pictures speak for themselves. If you have any questions leave them in the comments and  i'll try and answer them.
All Done!

September 29, 2011

ebi nigiri baby sushi costume

Ok, my fears came true. I'm sick. Actually, the whole family is sick. Travis came home from work early yesterday, and took the day off today too. We're all feeling quite under the weather. Thank goodness for dayquil/nyquil, but poor little lady she only gets baby tylenol to help her feel better.

To add insult to injury I'm also knee deep in dressmaking which needs to be finished by the end of the weekend. Hopefully I can churn out 2 more dresses this evening after Elle is down and before my nightly nyquil coma begins.

I already have clothing orders lined up for production in October, but I need to schedule in some time to make Ella's Halloween costume. Last year I wanted to make her my version of the Owl Costume from Pottery Barn, but I got over zealous on the time management for that project and scrapped it pretty quick. Instead I made my little lady a sushi roll! Ebi Nigiri to be exact, and complete with soy sauce/wasabi/ginger headband. She was definitely the cutest thing on the block that year. And the costume was SO simple make.

Here's a rundown of the project.

I used a white onesie and white leggings for the "white rice" portion of the costume.

For the "raw fish" part I just made a small orange pillow (basic orange rectangle lightly stuffed with polyfil) and sewed thin white twill tape to one side in a "v" pattern (you could use white ribbon as well), this served as the lines in the "fish". Then I attached the "pillow" to the costume by sewing/tacking the corners to the back of the onesie.

The green ribbon was used as the "seaweed wrapper". You can attach it to the fish portion (sew/glue it on) or just make a belt out of it and attach velcro in the front so that it is adjustable to baby's tummy.

For the headband I just cut out a grass shape of felt, and hot glued it to a white headband. Then I emptied a package of soy sauce and glued it to the "grass" along with makeshift  green felt wasabi ball and pink ginger flower. 

That's it! It's really not that hard. If you eat sushi you know what these things look like, and felt is very easy to work with. If anyone has any more detailed questions feel free to leave them in the comments and I'll try to better explain how I made the costume. It was darling on a baby, easy to get on them and off them too, and could be adapted to other sizes easily.


Now to decide what costume I'm going to make her this year, I have a few ideas already...I'll share them soon!


Linking up to this great blog.

August 15, 2011

modern embroidery

Let me start by saying I'm no embroiderer. In fact, I haven't really a clue as to any specific stitches or knots. I do however LOVE the look of modern embroidery. For years I've been holding on to a few hoops that I picked up a the thrift store, but my lack of knowledge on the art has kept me from doing anything with them. A few weeks ago I bought an assorted box of embroidery thread for a felt food project I'm working on (more about that later). I decided to go for it, and try my hand at making something with the hoops.

Originally I wanted to embroider Ella's name but because I'm no pro I just decided to stamp her name with black ink on the linen before putting it in the hoop. I actually like the look. It gives nice contrast and adds a different texture to the project. I think it also help keeps it modern and not so "grandma-ish". Apparently I'm no stamping pro either, my letters are quite off. And I will be honest, I had to stamp her name about 6 times before I got a piece I liked.

You can see I'm really not very good, which is evident in the loopy tail of the kite. It turned out more wonky than loopy. Ella has brown and pink in her room so I cut a little wool felt in those colors to make a kite and tail.

Overall it was a pretty easy piece to do, but I think i'll have to keep practicing this craft. It's fun!

Here is some inspiration to get you going. There really are some amazing things you can do with embroidery!
source
source
source

August 8, 2011

Sewing For Fall

Here it is, outfit/item #2 in the Sewing For Fall series I'm doing. At the end of the series like to have at least 8 pieces made for Ella's Fall wardrobe, a few tops, dresses, bottoms, accessories and maybe even a sweater. This simple peasant dress is similar to the cap sleeved tunic  (item #1), but with a full sleeve and elastic casing around the neck and arms. I didn't use a pattern for this dress, but again it's similar to this free tutorial and this pattern.
I think that it'll look darling with leggings, and I love the combo of polka dots and the funky strawberry print. (I can't find the names of the fabric, but they were ordered online. If anyone recognizes what they are please email me or leave a comment with the names.)
Since this is the second top/dress, I'll be doing a pair of bottoms next. I've been thinking about working with knit/jersey fabric on the next project, and leggings seem like a good addition to Elle's fall wardrobe. I've never really sewn with those types of fabrics, but I've been seeing a lot of great tutorials using jersey/knits. 

Are you doing any sewing for fall? Please share!