April 11, 2012

yellow and grey baby shower

I had the lovely pleasure last month of hosting a baby shower for my best friend. I really love party planning and putting a handmade touch on party decor. Here are a few Instagram photos (follow me! my handle is abstractgrace) of the party decor.

I was also happy to find that Kim from The Tomkat Studio, has teamed up with Pottery Barn Kids sharing great party ideas. There are some great video tutorials and free printables for all types of party decor. I took advantage of her beautiful designs and used the Sunshine Baby Shower suite for printable decor and invitations.

I wanted to go with a yellow and grey color scheme from the beginning. I thought that it was a perfect blend of gender neutral (she was having a boy). I didn't want to go to "boy-ish" with the shower. I guess I just like thing uber-girly!

The brunch menu included crepes with nutella, peanut butter, and preserves. We also had  fruit salad, quiche, goat cheese and crackers, and lemon bars (Ina Garten's amazing recipe). Yellow daises in mason jars tied with twine adorned the buffet and tables, and several walls were covered in vertical hanging crepe paper streamers and yellow and grey tissue paper poms.


My favorite part of the shower was the polaroid guest book. We set up a table with several chalkboard props and took pics of guests when they arrived. Then they were able to write a message below their photo to the mom-to-be and baby. Afterwards all the pictures went into a memory book of the shower as a keepsake for mom. 

It was such a lovely day and I got a lot of compliments from guests on how everything turned out. Now onto planning Ella's 2nd birthday!

April 9, 2012

the little one

Gosh, she's just the cutest thing, and picked the white beanie out herself from my closet. This kid has good taste! I adore her, runny nose and all. 
Happy Monday!

April 6, 2012

felt food making-peel-able banana

Here it is, piece #3, a fancy peel-able banana!
 I found a great tutorial for this piece over at the blog Just Stuff. It's always the piece that I get the most comments on. "Oh, a banana! And look it comes out of the peel!" Its the little things, I guess? ;) You can also use this same method for making a corn in it's husk. 

To see more felt food click below:

April 5, 2012

green smoothie

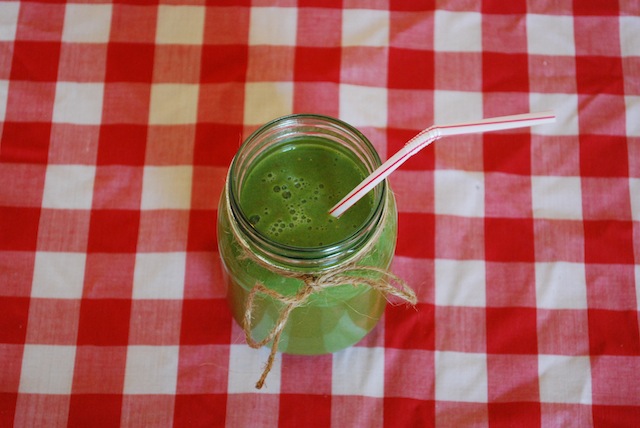
Spring is here! Yay, finally! The sun is shinning which makes taking blog photos much more enjoyable than fighting with dark skies and no natural light. It also makes me want to clean and eat healthier because I know i'll be forced into a swimsuit in a few short months (ugh). I'm trying to eat healthier (mmm...pizza) and tried my hand making a green smoothie after seeing a few motivating Instagram pics by Emma over at Red Velvet
This one has:
 two handfuls of spinach
one sliced apple
three large strawberries
one scoop protein powder
one cup water
a handful of ice
The verdict? It was yummy overall. I couldn't taste the spinach at all, but the consistency was rather thick. I think adding more ice would help for next time. The thing I like about it is that its filling. I couldn't even finish the whole thing. I'm looking forward to trying a few others this week, maybe something with blueberries? That sounds tasty.

April 4, 2012

diy blackboard

I just wanted to share with you a project I completed last week, a DIY kitchen blackboard. It was beyond easy, and only cost me $3.99! I've been wanting a chalkboard near the kitchen to write lists, notes, and menu plans on but the size of the wall I wanted to put it on was rather awkward. 
The frame I picked up at the thrift store, and the paint I already had. I just gave the frame a coat of white paint, then sanded around the edges for a distressed look. Then I flipped the mat board in the frame over and gave it two good coats of chalkboard paint. 
Easy peasy. 
If you're wondering where the quote is from, it's from the original movie Charlie and the Chocolate Factory. Willy Wonka whispers "so shines a good deed in a weary world" when Charlie gives back the gobstopper. It's probably my all time favorite quote. Ever. :)
Have a good day!

March 15, 2012

felt food making-watermelon

Here it is...felt food #2...Watermelon!  It's large, about 10" long, and was fun to make. I hand stitched the seeds with embroidery floss, and stuffed it with poly fill. 
To see more felt food click below:
Strawberries

March 13, 2012

felt food making-strawberries

Last summer I had a grand idea to make a few pieces of felt food a week for Ella. I was hoping that by Christmas I'd have a rather large selection to give to her along with the play kitchen we made for her (more on that project later). So I started making felt food. LOTS of it. I managed to take pictures of ALL of it, so I'll share one food at a time. 
It was a lot of work, but very much worth it. Ella loves to play with it, and I'm hoping that these will hold up to pass down to the next kid (whenever that it) and maybe even their kids!

First up, and perhaps my favorite of the bunch...Strawberries!
If you're interested in making your own felt food I'd suggest Googleing it. There are a million patterns for great felt foods.

February 8, 2012

mason jar + felt = love

I've been addicted to Pinterest (who isn't, right?) for a long while now. It's just the most amazing place to find new recipes, projects, and inspiration. I came across these Valentines day jars and happened to have everything to make them on hand (love when that happens).
First off I dyed my doilies in coffee. Don't worry, it was cold, old, stale coffee from the morning (wouldn't want to go wasting good coffee now would we?). I basically just let the doilies soak in the coffee for a few min, then placed them on a paper towel to dry. The rule of thumb is that the longer you leave them in, the darker they get.
 Then you just cut some hearts out of felt, and wrap the doilies and felt hearts around the jar with your bakers twine. I used a variety of jars I had on hand, so anything goes. Then you can fill your jars with candy or even use them as small flower vases. Easy peasy.
 If you want to check out the original blog post on how to make these click on over to this blog.

February 6, 2012

handmade valentines

While the husband and I were grocery shopping the other day Ella spotted a box of Princess valentines. She screamed "Cinderella! Princess!" in the middle of the store so I let her hold the box while we finished shopping. When it was time to checkout, Travis and I did the whole "distract and hide" bit to get the valentines out of her hands (if you have kids you know exactly what that is). 

I had borrowed a silicone heart mold from a friend and planned to make some homemade crayons as valentines. It was a really really easy project and they turned out so cute! I can't wait to package them up and give them to her friends.
Here's how to do it:

Peel the paper off of the crayons and break them up into small pieces. Fill the mold with the crayon bits (not too full, you don't want the melted crayons to spill over) and stick the mold on a baking sheet lined with foil (in case any crayon spills over). Put it in the oven at 250 degrees for 10-15 minutes. You'll be able to see when all the crayon bits are completely melted. It's optional but before I put the crayon pieces into the mold I gave each mold a shake or two of glitter. Once the crayons are completely melted take them out and let them cool in the mold on the counter or for faster cooling you can put it in the freezer. Then just pop them out of their molds. And just like that, brand new crayons!
 Here they are cooled in the mold.
 I separated my red, pink and purple bits together and green and blue bits together. You can mix all  your colors together or separate them for a more uniform look. It's up to you!
 I bought some 4" clear cellophane bags at Michaels to package them up in and plan on making a bag topper to attach to the top. Of course this is not only a great project for Valentines, but for anytime you have a million broken crayons lying around. I think her little friends will really enjoy their sparkly crayon Valentines. <3


February 2, 2012

feelin' the love

It's February 2nd! That means only 12 more days until Valentines day. We were at Lowe's the other night and I stocked up on paint swatches in shades of red and pink knowing that I'd need to decorate something for the holiday this month. I used the same method as my Halloween paint swatch garland (you can find my tutorial here). The only difference this time is that I glued my paint swatches together first (right sides out) and instead of using a 2" hole punch, I freehand cut hearts. The hearts are by no means exactly the same but they look cute hanging from the mantle nonetheless. It was so fast and easy that it got me wanting to start on another Valentines day project. I'll share that one next week!