July 30, 2012

homemade peach jam

I may have a new hobby. Yes, another to add to the list of 1,345,215 things that I enjoy doing. Canning! Travis and I ventured into canning when we were trying to make his barbecue sauce shelf stable. So we packed the mason jars full of sauce and boiled them, then sat back and listened to the "ping, ping, ping" and they self sealed. So gratifying to hear that little sound.
My sister in law recently bought a new house in the area and was lucky enough that the property came with 3 mature fruit trees, two apricot and one peach. We feasted on apricots (one of my favorites) prior to out adventures in canning, otherwise i'd be slathering apricot jam on every food item at every meal. 
Don't get me wrong, when we visited the new place a few weeks later we were lucky enough to pull about 20lbs of beautifully ripe peaches from her tree. She didn't want them and sent them home with us. I immediately knew I wanted to try my hand at making peach jam and canning it, and so I did!
We followed the directions on the back of the Sure Jell pectin package. "If its not broke don't fix it" was our first time jam making motto. And it turned out SO GOOD!!! I made a whopping 21 jars of jam and our tiny family of three has already gone through almost three jars. 

I also had to have labels for the jars. Im kinda obsessed with sticker paper and making custom tags and labels and stuff. It makes it look so much more official. I came across this amazing site called the jam labelizer where you can customize different designs and print them. Super easy, super cute. I named my jam after the little one-of course. 
I also DIY'ed a little something extra to go with the jam I gave to a few friends. There's a sneak peak below, but I'll share more about that later this week. Now don't be intimidated, go make some jam!

June 29, 2012

yo gabba gabba thank you

Ella's Yo Gabba Gabba 2nd birthday party was a huge success! I'll share pics of the party soon, but until then I wanted to share the "thank you" card that I designed for all her guests. 

I really enjoy designing invites and thank you's. Here is a thank you I designed recently for a friends little boy. Can you guess the theme of his 2nd birthday party...yep, Sesame Street!

Hope you're all having a great week!

xo,
Laura

June 26, 2012

4th of july pinwheel tutorial

Today I'm sharing a quick and easy tutorial for making 4th of July decorations. Pinwheels are fun, simple to make, require basic supplies, and are perfect for last minute procrastinators, ahem...like myself. I made two sizes of pinwheels, a 12 inch and a 6 inch. Both are fun, but the large ones really make an impact. I chose not to put stakes on mine, but if you'd like to line your driveway or use them as festive cake toppers just tape a bbq skewer onto the back. 
Happy decorating! 

May 31, 2012

happy birthday Ella June, you're TWO!

Happy Birthday my sweet baby girl. I can't believe you're TWO years old today. You're truly the most beautiful child and I'm blessed beyond measure by your loving spirited personality. You have the best parts of your daddy and I, and we love you SO MUCH!
Happy Birthday Junebug!
We're having a party this weekend, and its Yo Gabba Gabba themed! Yay! I'll be sure to post pictures next week after the party, but until then...here's the party invite and water bottle labels I designed for the party. 

May 28, 2012

homemade baked apple chips

After my attempt at homemade fruit roll ups I decided to try my hand at another homemade snack, apple chips! I love the store bought ones, but they tend to be expensive and chocked full of preservatives and added sugar. Today I have a recipe for the easiest snack ever. They're perfect for making in large batches, taste amazing, and keep well for extended periods of time. They are also great for using only organic ingredients, because well...there are only 2 in this recipe.

Ella loves them, this pic of her trying to steal the bowl of them is proof that they're kid friendly. 

Step 1
Wash and slice 2 apples into thin slices. The thinner they are the faster they dry out, and the more chips you get, however they are crispier. So if you like less crunch and more crisp then opt for slightly thicker slices.
Step 2:
Remove the seeds and any tough bits of the apple core. I used a metal pastry tip as a tiny cookie cutter type tool to cut out the middles of my apple. (You can see it pictured in the photo next to the cinnamon).
Step 3:
Place apple slices on parchment paper lined baking sheet and sprinkle with cinnamon, organic preferably.   :)
Step 4:
Set your oven to 225 degrees. You want a low temperature because you aren't cooking the apple slices, you are drying them out. It should take about 2 hours to dry out the apples, depending on how thick they are sliced. Flip them after an hour. If they are not done after two hours just check on them every 15-20 min until they are dry to the touch.
Voila!
They're done. Now try not to eat them all in one sitting. 
Believe me, you'll be tempted to. 

May 24, 2012

Birthday Balloon Wreath Tutorial


Im still trying to believe my little one is going to be TWO next week. The proof is in the pink chalk that's scribbled on my front door, i'll get to cleaning that off eventually. 

Memorial Day weekend is a special time around our house because Ella was born on Memorial Day 2010. It's great for her because she'll always have a 3 day weekend for her birthday, and great for mommy and daddy because we have an extra day to recuperate after all her birthday festivities. 

This wreath is so colorful and perfect for letting the neighborhood know that someone in your household has a birthday.  I'm looking forward to hanging it up a few times a year to celebrate all our birthdays. It's so cheerful, who wouldn't be happy when they see it. 

Read on for the full tutorial!
Supplies needed:
14" Styrofoam wreath (I got mine at Michaels, it was $6.99, but with a 40% off coupon I paid $4.50)
2 Pkgs 100 ct greening pins (Got these at Walmart in the floral section for $1.00 a package)
3 Pkgs 72 ct Balloons (Also purchased at Walmart for $4.50 a package)
Ribbon (I already had on hand)

TOTAL COST: $20.00


NOTE: Before you get started, you have the option to wrap your styrofoam wreath in ribbon. I decided to do this so that the back of the wreath is covered in something instead of seeing styrofoam, it just gives it a more polished look. It's not necessary though because you wont be seeing the back side of the wreath when the project is finished. Just personal preference.
Step 1: 
Take 2 balloons and stack them on top of eachother. Place the middle of the stacked balloons between a greening pin.
 Make sure the balloons are centered, if they're not you can adjust them once you push them into the stryofoam wreath, but better to make sure they are before you push them in. Assuring they are centered helps keep your wreath uniform and full. 
 Step 2: 
Push the greening pin with the balloons into the wreath.
 See how the balloons are centered? :)
Step 3: 
Keep on goin'! Continue to place balloons into the wreath until you've covered the whole front side of the wreath. Depending on how big/wide your wreath is you'll need to put more balloons towards the middle and the outer edges. You want your balloons to be close together so that you cannot see the wreath underneath, but not so tight otherwise you'll run out of balloons the last few inches, and running out to buy more balloons when you're that close to finishing doesn't sound like fun. 
 Yep, there's A LOT of balloons to be attached, so keep on going!

Step 4: (not pictured)
Before you completely cover the wreath cut a length of ribbon to hang your wreath and attach it with a few greening pins, then continue to cover right over that ribbon with the rest of your balloons. 

You're finished! Now hang that baby up and get ready to celebrate!

May 4, 2012

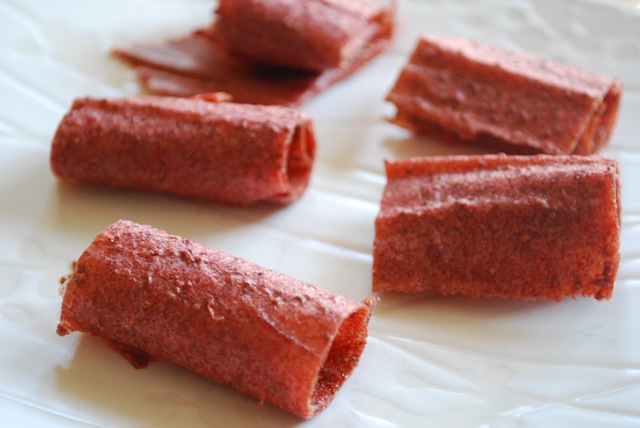
homemade junk free fruit roll ups

Lately I've been on a crazy fruit eating, no carb, no sugar eating spree. I've been watching the calories i'm eating and cut out, well...almost everything I used to eat (ie. junk, junk and more junk). I was craving something sweet but with no added sugar. This recipe fit the bill perfectly! It's only 2 ingredients and you can feel good that it doesn't have all the chemicals and junk that traditional fruit roll ups are filled with.

Wash and cut 2 lbs strawberries.
Put them in the food processer. I have a mini one so I did mine in batches. Process until smooth.

Pour the strawberry puree onto a parchment lined baking sheet. The parchment is important. It will keep the fruit roll ups from sticking and help them to come off in one big sheet.
Spread the puree out, try and keep it in an even thin layer on the baking sheet. 
Add a sprinkle of cinnamon to the puree. It gives it a subtle flavor. Yummy.
Next, turn you oven to the lowest temperature it will go, for my oven that was 180 degrees. Leave in the warm oven for 6-8 hours or until the strawberry puree is dry to the touch. When its done let it cool to room temp and peel it off the parchment, then roll up, cut and enjoy!

April 16, 2012

felt food making-waffles + pancakes

Here's our first breakfast addition to the felt food collection, waffles and pancakes! The waffles were just squares of felt with batting in between sewn together. I went back and sewed squares in the middle to show the pockets real waffles have. If you're interested in how I made the pancakes (complete with butter pats a top) check out this great tutorial, I used the same method. 

To see more felt food click below: